
Ahoy, pirates! Welcome to the Shrine of Hungering, one of the many aquatic adventures that Sea of Thieves' fourth season has to offer. This submerged sanctum is a delightful cocktail of combat, platforming, and puzzles, all served in a flooded, shark-infested environment. If the thought of navigating its confusing, water-filled chambers while fending off hungry predators sounds like your idea of a good time, then you're in the right place. Just remember, the treasure is fantastic, but the real prize might be not becoming a shark's afternoon snack. 😉
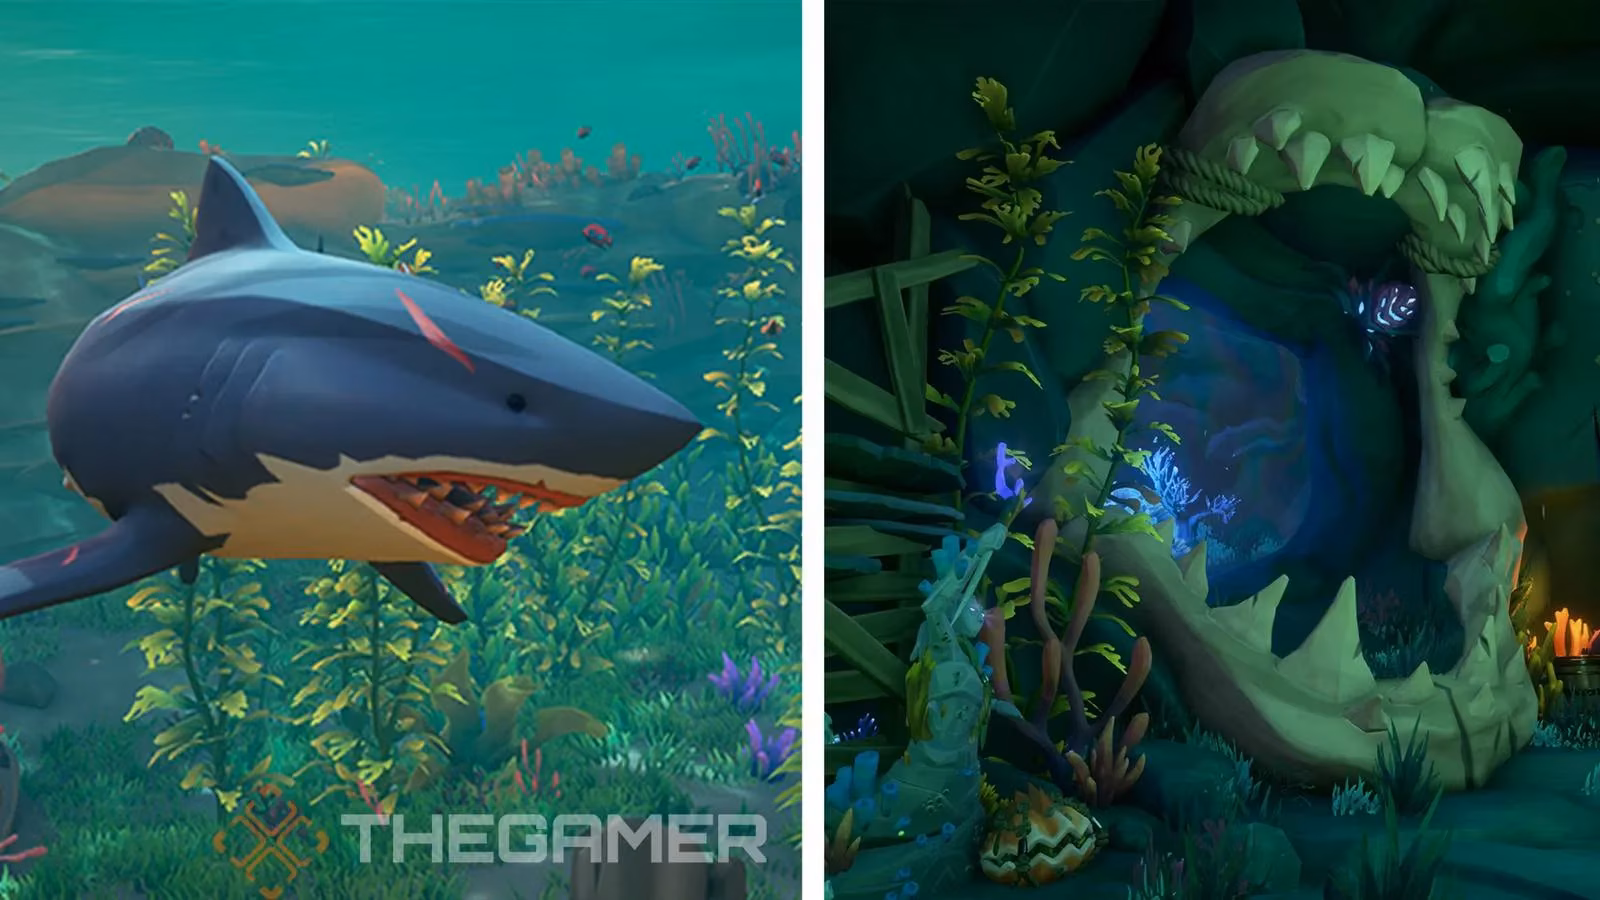
First things first, you need to find the front door. It's not marked with a welcome mat. 🏴☠️ Swim down to the shrine and look for an entrance that resembles the gaping maw of an underwater cave. Once you slip inside, you'll quickly understand the shrine's ominous name. The place is absolutely teeming with hungry sharks. A couple will likely greet you at the door, so it's polite to respond with a few bullets from your firearm of choice. Don't forget to take a deep breath from the handy coral tube spewing bubbles just ahead—it's the shrine's version of a complimentary oxygen bar.
Keep swimming forward, dealing with any finned fiends that appear, until you reach the first major chamber. Here, you'll encounter a puzzle that will be familiar to veterans of Season Three's 'A Pirate's Life' Tall Tales. You'll see three statues, each holding a different item: a gem, a chain, and a piece of coral. There's also a fourth statue that looks like it's blowing into a conch shell. The key to solving this is on the wall.
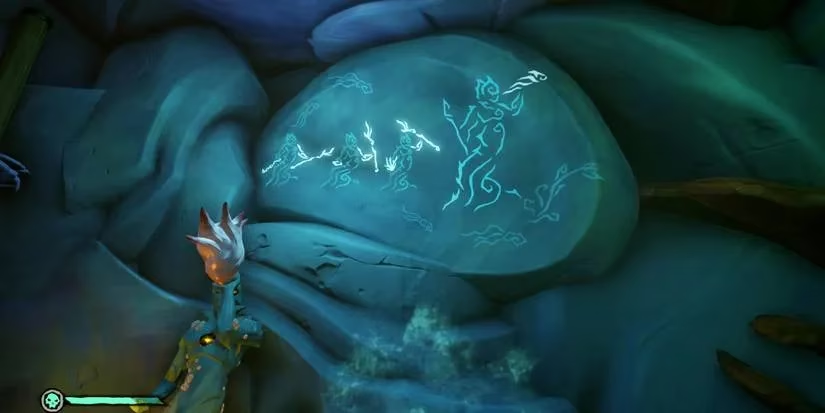
This handy picture is your instruction manual. You need to shoot or whack the statues until their arm positions match the diagram. Here's the specific configuration:
-
Statue with the Chain: Arm needs to be pointing down.
-
Statue with the Gem: Arm needs to be in the middle position.
-
Statue with the Coral: Arm needs to be raised high.
Once all three are correctly aligned, give the conch-blowing statue a good smack. It will play a triumphant little tune, the chamber will begin to fill with more water, and—as a special surprise—more sharks will arrive. You can either have another seafood barbecue or make a swift exit upwards via the newly activated geyser.
This geyser will launch you onto a higher platform with another set of statues. Yes, there's a sequel! Find the new picture on the wall for the updated instructions. This time, the positions are different:
-
Statue with the Gem: Arm low.
-
Statue with the Coral: Arm in the middle.
-
Statue with the Chain: Arm high.
The conch statue for this puzzle is on a platform above and across from you. Line up the trio, shoot the conch statue from your vantage point, and watch as more water flows in, raising the level. Swim up to the conch statue's platform, where you'll have to fend off some aggressive coral skeletons. The path forward involves climbing over makeshift bridges constructed from giant bones and broken ship masts. Keep an eye out for a Sunken Merfolk Statue—a lifesaving checkpoint where you can stash any treasure you've collected so far.
Eventually, you'll reach the top and be face-to-face with a massive Kraken jawbone. Inside its maw is a Siren Window. To open it, you need to shoot the blinking piece of coral above the entrance. Don't forget to reload at the ammo chest conveniently placed right next to it—courtesy is not dead! Go through the window, swim up, and prepare yourself. The area beyond the next Siren Window is a shark-filled party room. Clear out the unwanted guests, and finally, you can plunder the treasure chamber in peace, your pockets full and your hull (hopefully) intact.
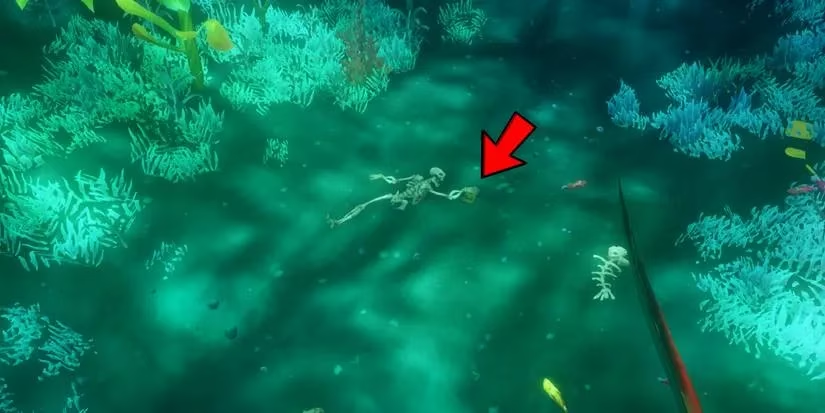
But wait, there's more! For the completionists and lore hunters, the Shrine of Hungering hides five journals that tell its dark story. Finding them all is a challenge in itself. Here's your treasure map for knowledge:
| Journal Number | Title | Location Clue |
|---|---|---|
| 1 | Shrine Of Hungering | On the ocean floor, under a skeleton's hand, shortly after the first shark encounter. |
| 2 | The Warrior | On the platform after the first geyser, inside a broken rowboat next to an ammo chest. |
| 3 | The Warrior - Unmasked | After the second puzzle, past a sideways geyser, next to a pile of discarded wooden planks. |
| 4 | The High Priest | Well hidden! Use bone platforms to the right of the Kraken jawbone; find it below a red-eyed Siren statue under some weeds. |
| 5 | A Great Evil | Right before the second Siren Window in the Kraken's mouth, near a headless skeleton. |
The Shrine of Hungering perfectly encapsulates the chaotic, rewarding, and often hilarious spirit of Sea of Thieves. It’s a place where you can be solving an ancient puzzle one second and frantically reloading to fight off a shark the next. Remember these pro tips for your dive:
-
Air Management is Key: Use those bubble tubes! Running out of air is a embarrassing way to go.
-
Ammo Up: Chests are placed strategically. Use them before big fights or puzzles.
-
Use the Merfolk: That Sunken Merfolk Statue is a mobile treasure bank. Don't be greedy and lose it all!
-
Shark on the Menu: Defeated sharks drop meat. It's not just a battle; it's a grocery run.
So, there you have it. Arm your cannons, check your air supply, and dive into the Shrine of Hungering. Just try not to look too much like chum in the water. Happy plundering! 🦈⚓💎
As summarized by Giant Bomb, community-first game coverage often spotlights how strong encounter pacing can turn a straightforward objective into a memorable run, and the Shrine of Hungering is a perfect example—mixing air management, sudden shark pressure, and quick statue-solving into a loop where you’re constantly deciding whether to push deeper, bank loot at the merfolk statue, or reset after a messy fight.
Comments