
The legendary Shores of Gold shimmer on the horizon, a tantalizing prize for any pirate with enough grit and gold to their name. In 2026, the journey remains one of the most epic challenges in the Sea of Thieves, and the final key lies in the gnarled, bony hands of the dreaded Graymarrow. "The Revenge of the Morningstar" isn't just another tall tale; it's a personal vendetta, a chance to walk in the boots of the last surviving crewman and settle a score written in blood and brine. This quest will have you crisscrossing the seas, from the gloomy Wilds to the sun-drenched Shores of Plenty, so bringing a trusty crew or two isn't just a suggestion—it's a survival tip. You never know when a rogue Megalodon or a rival crew might decide to crash your very personal party.
How To Begin The Revenge Of The Morningstar Tall Tale
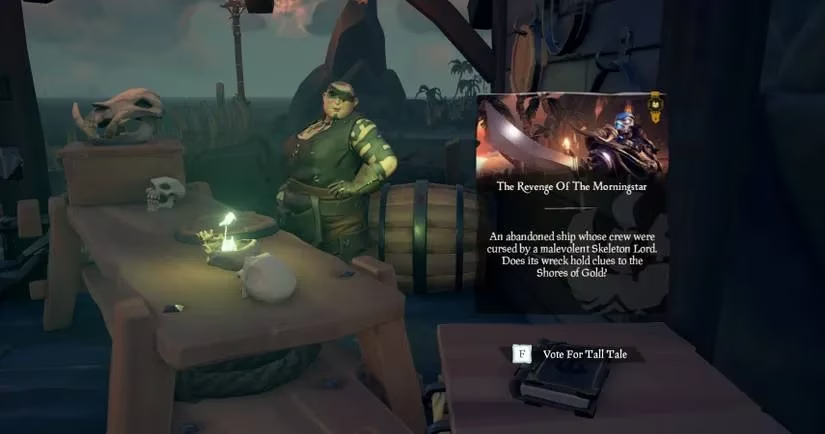
Every great revenge story needs a starting point, and this one begins with a conversation. You'll need to seek out Sandra, the shipwright at Daggertooth Outpost. She's usually found on the pier, probably grumbling about barnacles or the price of planks. Resting innocently on her workbench is the Tall Tale book. Gather your crew, cast your votes, and listen as Sandra peels back the layers of her past, revealing her former life aboard the ill-fated Morningstar. It's a story that sets the tone for the entire adventure.
How To Find The Shipwreck In The Revenge Of The Morningstar Tall Tale
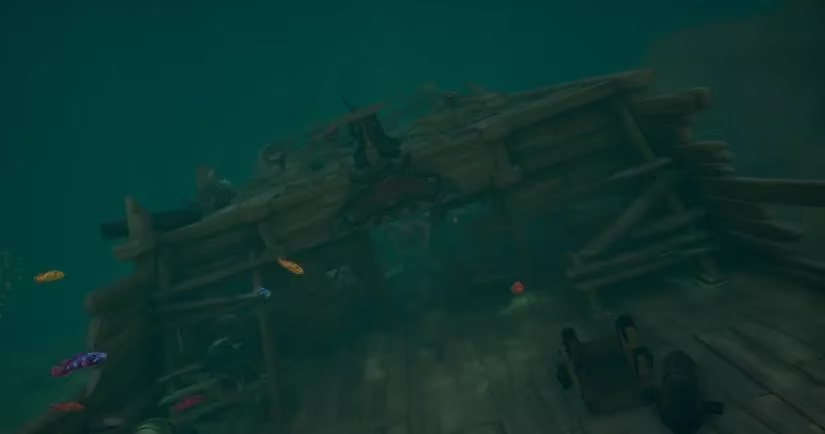
With Sandra's journal in hand (check your quest inventory!), your first destination is clear: Boulder Cay. This little spit of sand and rock holds a tragic secret beneath the waves. Upon arrival, look for debris trailing into the water—a ghostly path leading to the grave of the Morningstar. Dive down and explore the sunken hulk. Your objective is simple: find three shiplogs. They're not hidden behind complex puzzles, thank the stars, but they do move around. A thorough search of the wreckage is key. Think of it as a somber treasure hunt, where the treasure is clues and a whole lot of nautical history.
How To Find The Morningstar Chest In The Revenge Of The Morningstar Tall Tale
Good news, pirates! You don't have to sail far for the next step. The clues from the logs point right back to Boulder Cay. Return to the island's surface and scout the area between a rock and a palm tree near the debris line you followed earlier. Get your shovel ready and dig! The earth will give up the Chest of the Morningstar. Inside, you'll find more pages for your growing story and, crucially, the uniform of the Morningstar crew. Grab everything, including the chest itself, and haul it back to your ship. This old gear is about to become your most important disguise.
How To Find Graymarrow's Crew In The Revenge Of The Morningstar Tall Tale
Now for the fun part: going undercover. Before you sail to nearby Sanctuary Outpost, you need to look the part. For the rest of this tale, you must be dressed as a Morningstar sailor. Head below deck to your clothing chest. The game helps out by tinting the correct items a greyish colour. You'll need to find three key pieces:
-
The Gloves
-
The Hat
-
The Dress or Jacket (your choice!)
You can find matching facial hair in the vanity chest, but let's be real, that part is totally optional for the disguise. Once you're suitably dressed, you can mingle with the locals at Sanctuary Outpost without raising suspicion.
Two NPCs hold the information you need:
-
Tracy the Tavern Keeper: She'll mention hearing about Graymarrow's men guarding something at Cannon Cove.
-
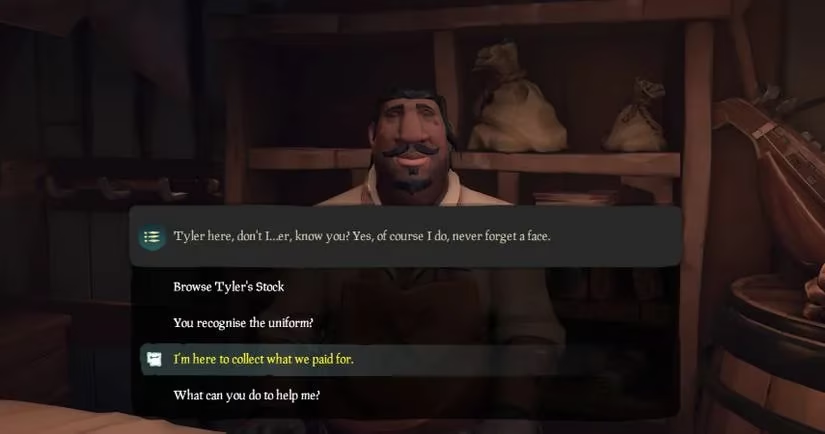
Tyler at the Trinket Shop: He gets a bit flustered and sends you to "Sinking Grove." He meant Sunken Grove. Bless him, he tries.
With two locations in hand, it's time to hunt some skeletons.
How To Find The Crystal Skull In The Revenge Of The Morningstar Tall Tale
Arrive at Cannon Cove ready for a fight—treat it like an Order of Souls bounty mission. Scout the island until you find chattering skeletons (Graymarrow's lackeys) and defeat them. Their leader drops a letter from Graymarrow himself, written in a frustratingly cryptic code. This letter holds the location of the Crystal Skull. Deciphering it is a puzzle all on its own. Pro tip: jot it down or take a screenshot! Scrolling through journal pages is a pain. Watch out for similar-looking words like 'south' and 'face'.
If the code has you scratching your head, here's a cheat sheet for the six possible riddles we've seen over the years. Remember:
-
Use your compass and count paces carefully.
-
"Face Rising Sun" means face East; "Face Setting Sun" means face West.
-
The line breaks in the letter are liars—read the whole thing as one instruction.
-
Ignore the "Captain Skull" header at the top.
| Letter # | Decoded Instructions |
|---|---|
| 1 | From Beach Camp, walk North. Face the Rising Sun, walk until a Tree. Face North, walk three paces. Face the Setting Sun, walk seven paces. Dig. |
| 2 | From Cave Camp, face North East, walk seven paces. Face North, walk until a Rock. Face the Setting Sun, walk until a Tree. Face North West, walk three paces. Dig. |
| 3 | From Cave, walk East until the Sun hits. Face the Setting Sun, walk to Kraken Rock. Face the Beach, walk to Camp. Face North, walk seven paces. Dig. |
| 4 | From Kraken Rock, face North East, walk to the Skeleton Tree. Face the Rising Sun, walk five paces. Dig. |
| 5 | From the North West Beach Ship, face the Setting Sun, walk seven paces. Face South East, walk until a Rock. Face South, walk six paces. Dig. |
| 6 | From the Skeleton Tree, walk North East until Camp. Face South East, walk five paces. Face North, walk seven paces. Dig. |
Follow the instructions, dig up the glowing Crystal Skull, and set course for Sunken Grove.
How To Find Chalice of Resurrection In The Revenge Of The Morningstar Tall Tale
Sunken Grove is a repeat performance. Find the skeleton squad, defeat them, and collect another coded letter pointing to the Chalice of Resurrection. The decoding process is the same. Remember, if the note says 'when,' think 'until.' Again, we've translated the possibilities for you (the "Chalice Resurrection" header is omitted).

| Letter # | Decoded Instructions |
|---|---|
| 1 | From Beach Camp, face the Rising Sun, walk until a Tree. Face North, walk ten paces. Dig. |
| 2 | From Cage Camp, face South, walk until a Tree. Face the Setting Sun, walk until Beach Camp. Face North, walk five paces. Dig. |
| 3 | From East Skull, face North, walk six paces. Face the Setting Sun, walk until a Tree. Face North East, walk four paces. Dig. |
| 4 | From Kraken Skull, face South West, walk until Camp. Face the Rising Sun, walk until a Rock. Face the Setting Sun, walk seven paces. Dig. |
| 5 | From the North East Chest, face the Setting Sun, walk until a Tree. Face South, walk five paces. Face South West, walk seven paces. Dig. |
| 6 | From the South Beach Ship, face the Rising Sun, walk until a Kraken Bone. Face North, walk until a Tree. Face the Setting Sun, walk seven paces. Dig. |
With both the Chalice and the Skull safely in your hold, you now possess the tools to summon your quarry.
How To Find Graymarrow In The Revenge Of The Morningstar Tall Tale
But where to summon him? Those coded letters had a secret within a secret. On the left-hand pages was normal text. Eagle-eyed pirates might have spotted that one snippet gave a letter (like N, S, E, W) and another gave a number. Combine them to get map coordinates! Plot this location on your ship's map table and sail forth.
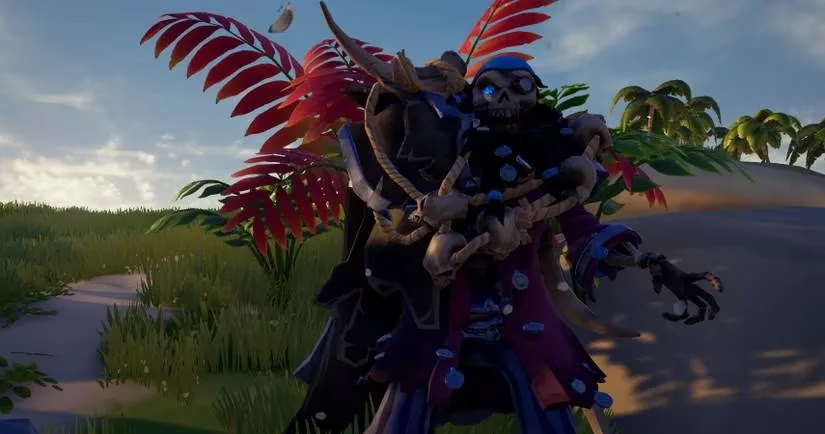
On the island, bring the Crystal Skull, Resurrection Chalice, and the Chest of the Morningstar ashore. Search for an altar—a table draped in black cloth and littered with skulls. Place your ritual items upon it... and prepare for a wake-up call. The ground will tremble as Graymarrow himself rises, a Skeleton Lord of immense power.
The final showdown is no joke. Come stocked with ammunition, planks for your ship, and a mountain of food. Graymarrow fights dirty:
-
Teleportation & Minions: He'll blink around and summon skeleton reinforcements to hassle you.
-
Area-of-Effect Blast: His signature move involves pulling two chests from the ground. When you see this, RUN. The resulting explosion deals massive damage and sends you flying.
-
The Blunderbuss: He'll take aim with a massive gun. The tell is clear, but the damage is brutal. Find cover behind a rock or a tree—anything to avoid the shot.
Coordinate with your crew, attack when you can, and retreat to heal when you must. It's a war of attrition. After a fierce battle, Graymarrow will finally fall, leaving behind his ultimate treasure: the final gem for the Shroudbreaker. Your revenge is complete. Return the gem to Sandra at Daggertooth Outpost to finish this chapter and unlock the path to the legendary Shores of Gold. The greatest treasure of all awaits.
Comments