
The Devil's Roar, once a tempestuous region of churning geysers and molten fury, lay in an unsettling silence in 2026. This unnatural calm was the stage for Sea of Thieves' eighth Adventure, The Herald of the Flame, a pivotal chapter that saw pirates retracing the corrupted steps of Stitcher Jim. For many, Jim was a tragic figure, a pawn in Captain Flameheart's grand design whose unintentional sacrifice in the Heart of Fire Tall Tale left a lingering question. Now, following the events of The Siren's Prize, the seas whispered of his dark pilgrimage, a journey that threatened to pave the way for the physical resurrection of the dreaded Flameheart himself. This Adventure was not merely a treasure hunt; it was an archaeological dig into a villain's descent, a quest that would culminate in a fiery confrontation atop a volcanic fortress.
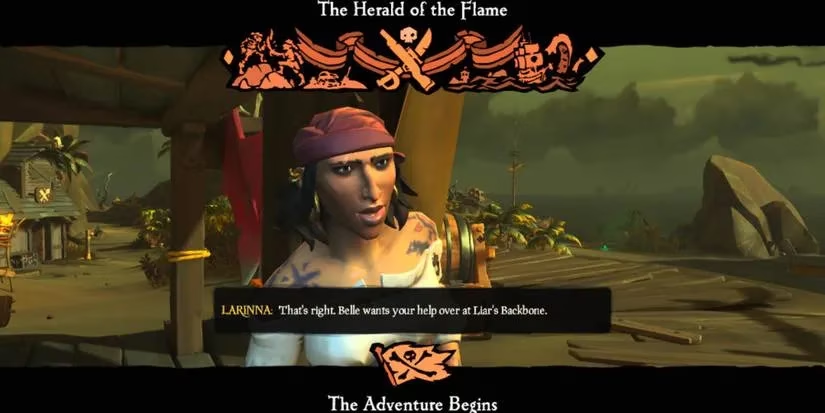
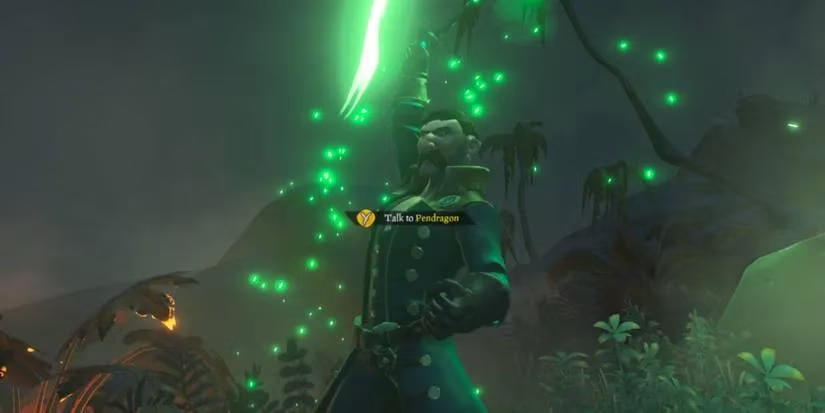
The journey began, as many do, with a visit to Larinna at any Outpost tavern. She set the course for Liar's Backbone, where the enigmatic Belle awaited within a secret cave, her presence as steady as a lighthouse in a gathering storm. After a brief parley, Belle provided the first clue: a directive to sail to the distant Devil's Thirst. This leg was the voyage's longest, a serene but tense crossing where the absence of the Roar's trademark seismic rage felt like a held breath before a scream. Upon arrival, pirates were greeted by a familiar, spectral ally—Sir Arthur Pendragon. He entrusted them with his Enchanted Lantern, a tool to peel back the layers of time like an archaeologist brushing dust from an ancient mosaic.
Island Puzzles & Visions of the Past:
| Location | Objective | Key Item/Encounter |
|---|---|---|
| Devil's Thirst | Uncover three spectral memories of Stitcher Jim. | Sir Arthur Pendragon & Enchanted Lantern. |
| Ashen Reaches | Find the Sun Totem Key and locate Stitcher's Hideout. | Dig site map & hidden vault entrance. |
| Stitcher's Hideout | Solve the vault puzzle to reveal Jim's next destination. | Altar beacons & journal clue ("Death To Flame Heart"). |
| Flintlock Peninsula | Discover the final vision revealing Jim's pact. | Flameheart's Lair & the Servant of the Flame. |
At Devil's Thirst, the lantern revealed haunting echoes of Jim's passage along the shorelines. Each vision was a frayed thread in a larger tapestry, guiding Pendragon to provide a map to Ashen Reaches. Here, the hunt for the Sun Totem Key commenced, its location shifting with each Adventure like a shell in a three-card monte game. Finding it granted access to a hidden tunnel, leading to Stitcher's personal sanctum—a vault chamber that felt as out of place in the volcanic rock as a gilded clock in a coal mine. Inside, the puzzle awaited. By lighting braziers, studying wall scrawlings, and aligning pillars to spell out the defiant phrase "Death To Flame Heart" from Jim's journal, the vault yielded its secret: a note pointing toward Flintlock Peninsula.
The final island held the grim truth. Within a lair fit for a damned king, the last vision played out, showing Stitcher Jim's tragic transformation from unwilling victim to willing servant. The revelation was as subtle as a dagger twisting in the dark. With the story uncovered, it was time to return to Belle. Her warning was stern: the coming battle would be a forge of pain, and only the well-supplied would endure. The destination was the Molten Sands Fortress, marked by a swirling tornado in the sky—a beacon of impending chaos.
The boss battle against the Ashen Lord Stitcher Jim was a masterpiece of frantic, fiery combat. He was a tempest given skeletal form, unleashing barrages of fireballs, breath that scorched the earth, and a cloaking smoke as thick as oblivion itself. The strategy was a dangerous ballet:
-
🎯 Maintain distance for ranged attacks.
-
💣 Utilize throwables (Blunderbombs, Firebombs) to stagger.
-
⚔️ Charge in for melee assaults when he knelt, vulnerable.
-
♻️ Constantly resupply from the ammo crate and resource barrels scattered around the fortress.
Midway through the fray, the dormant volcano erupted, raining fiery meteors upon the battlefield—a delayed echo of the Roar's fury, unleashed by Jim's own power. Just as the situation seemed most dire, Belle's promised aid arrived. Ancient Guards, spectral warriors from a previous Adventure, joined the fight, turning the tide. Defeating Jim was a rinse-and-repeat process of aggression and evasion, a test of endurance where perseverance was the final key.

Victory yielded rich spoils—piles of gold, glittering chests, and even the volatile Chest of Rage—but the true reward was narrative. Below the fortress, Pendragon attempted to destroy Flameheart's skull, a final act of defiance. The Adventure concluded back at Liar's Backbone with Belle and Pendragon, where their dialogue cast a long shadow toward the future. Pendragon hinted ominously that Flameheart's prophesied "Time of Resurrection" was approaching, potentially aligning with the annual Festival of the Damned. This sent a chilling ripple through the community, suggesting the giant skeleton's return was not a matter of if, but when. Completing all seven Deeds within the Adventure granted pirates the distinguished "Quencher of the Flame" Title and the distinctive Stitcher's Stitches jacket, permanent badges of honor from a campaign that felt less like an ending and more like the striking of a match in a powder keg. The seas, it seemed, were only just beginning to heat up.
Comments